Do you love the idea of Interactive Notebooks but are unsure of how to use them to teach class novels? Stay tuned for my best tips and tricks for designing rigorous and engaging class novel units.
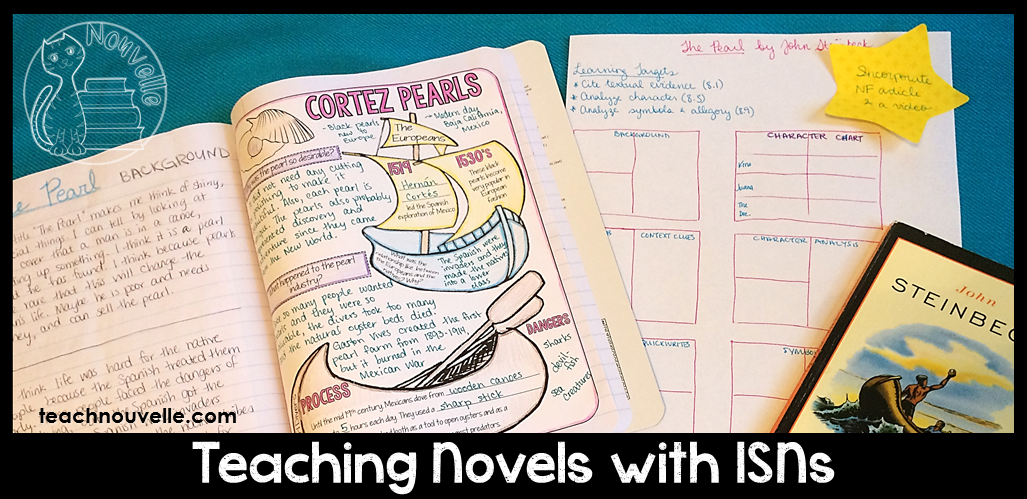
I am a huge proponent of using Interactive Student Notebooks (ISNs, INBs, INs) in high school. I love them for the ease of structuring a lesson, keeping everyone organized, and helping students create a yearlong learning tool. Once your students get onboard, it can even be a relaxing addition to your classroom since there can be some coloring or crafty elements. And whereas people find it easy to set up a spread for a single lesson, I often get asked how to set up an notebook for an entire class novel.
Well, I’m here today to share my planning tools, tips, and tricks for using Interactive Notebooks as you read a novel as a class. The focus is on designating spreads to be developed and completed over the course of the class novel. I’m a very visual learner, but I’ll share ways to adapt each step of my planning for the rest of you.
Step 1: The Basic Concepts & Spreads
If you’ve read my post on teaching symbolism & allegory, you know most of my spreads (two facing pages) follow a simple IN-THROUGH-OUT design. I have a few more spreads that I use for whole units. I keep these possibilities in mind as I develop my unit, adapting as necessary.
Background Spread
I usually start each unit with some sort of background. I design each spread based on my needs, but this is where I put self-designed reference materials or fabulous resources from TeachersPayTeachers like a map of Odysseus’ travels, or a web of character relationships from A Midsummer Night’s Dream.
Vocabulary Spread
Sometimes, I have students learn specific vocabulary words, divided into sections or chapters. I do this as a foldable or have students create Frayer Models (2/pg) for selected vocabulary.
Quickwrites/Bellringers Spread
This is simply a set of pages waiting to be filled with writing prompts. I usually set aside one or two spreads (2 or 4 pages) per novel, depending on how often I want students to write. I also use the Bellringer phase of class for students to work on their Character Charts or Vocabulary.
Character Chart
This is a spread that is set up at the beginning of the novel, but filled in over the course of reading. I will tell students exactly how many rows to create and which characters to put on each row, but the grid will probably be blank for the first few days of reading.
One-Pagers
Students demonstrate understanding of certain themes, characters, or symbols over the course of the novel. A “one-pager” is any collection of elements assigned by you, but designed by the student on the page. You can assign topics for One-Pagers, or have students choose. I sometimes assign these after specific sections (ex: Chapters 1-3) in the novel. I also like to assign broad topics (ex: “Pg. 42 will be a Theme of your choice”) to make sure that I see a variety of student work.
One-Pagers are meant to be a synthesis of several elements. Here are some elements to choose from:
*An analytical overview of your topic in the novel
*A drawing
*2 quotes reflecting your topic
*2 discussion questions
*2 text-to-text connections (ex. Connect to another book or TV show)
*2 text-to-world connections
Close-Reading or Constructed Response
I have students complete constructed responses in their journals, and then self- or peer-grade, according to where we are in the learning process. These practices are only for participation points. Then, we’ll do a similar constructed response as a quiz in class.
Step 2: Map Out Your Class Novel
Next, I map out my class novel unit on scratch paper, based on my learning targets.
When I first drafted my unit for The Pearl, I put together some of the basic spreads that I listed above. At this point, it’s all ideas, and it’s okay to move stuff around.
However, mapping out my unit helps me figure out the gaps I want to fill. For this unit, I knew that I wanted some nonfiction texts and a video or two. I decided to create Background Activities for my students, and this is what I came up with.
I also figured that I wanted my students to do One-Pagers on two themes that I chose, namely Heritage & Society. The mapping process allows me to develop my ideas for each unit.
Step 3: Order Your Lessons
Once I’m finished mapping out the interactive notebook spreads, it really helps me to solidify the order of my lessons. I like to give students a copy of the spreads as a Unit Overview sheet.
It’s great if you can stick to this throughout your unit, but it’s not a huge deal if you can’t. I’ve added and subtracted spreads here and there to reinforce skills students needed to work on or move a unit along when a surprise school event lost me a day of class. Students will roll with these punches. Still, the Unit Overview is a wonderful tool to help students (and you!) see the end goals of the unit.
Hint: I like to print these on bright copy paper so that students can locate them quickly and easily in a binder (or in the pocket of their interactive notebook).
Step 4: Mock-up Your Pages
You will have better results with Interactive Notebooks if you mock-up your pages. This will help you know exactly how long it takes to cut and glue any foldables you use, or how much space students will need to take notes on a PowerPoint.
I like to have a notebook for each course I’m teaching. I also like to streamline my color-coding by having these match other things in my classroom.
Step 5: Rock the Class Novel Unit!
Now, you’re ready to teach! You can get all of my resources for designing a Novel Unit for Interactive Notebooks in my TpT store, and you can always leave a comment with any questions you’ve had. I love seeing success stories on social media, so let’s connect!
Check out more resources for high school Interactive Notebooks on Pinterest:



6 Comments
Nicola
February 26, 2017 at 9:04 amThis is actually super useful! One of the most useful posts for INBs I’ve seen around. Thanks so much for sharing!
Allison
July 21, 2017 at 10:20 pmDo you make an interactive notebook for elementary? I love interactive notebooks, and I want to use them for our novels.
Danielle Hall
July 23, 2017 at 10:44 amThanks for reaching out, Allison! I know they are a lot of great resources out there already for elementary, so my focus is on creating higher quality resources for interactive notebooks for secondary ELA. I’ve also never taught elementary, so I’m not even sure how to advise you on adapting my method to work for your students. Sorry I couldn’t be of more help, but best of luck! -Danielle
Grading Interactive Notebooks - Nouvelle ELA Teaching Resources
August 15, 2017 at 3:29 pm[…] Read about Planning Novel Units for Interactive Notebooks […]
ссылка на мега маркет
November 14, 2023 at 6:12 amid=”firstHeading” class=”firstHeading mw-first-heading”>Search results
Help
English
Tools
Tools
move to sidebar hide
Actions
General
casino
October 12, 2024 at 3:22 amExcellent post. I will be experiencing a few of these issues as well..